Wednesday, January 23, 2013

DIY Laptop Sleeve: Tutorial


Here is a laptop sleeve tutorial. It's simple and can be done in about an hour!


Materials:
1/2 yard exterior fabric (flower fabric from Hobby Lobby)
1/2 yard for lining (I used faux gray suede - super soft)
Scrap of fabric for flap
Batting
1 Button
Sewing Machine
Needle and thread (for button)

First, measure your laptop. 
Mine is a 15" Macbook Pro so it ended up being 14.5" W x 10" H x 1" D
You will need to allow for seam allowance. I added 2.5 inches extra because I used double batting. Total equals = 17" W x 12.5" H

Step 1: Cut

Two rectangles of exterior fabric measuring 17" W x 12.5" H (or insert your numbers here)
One rectangle of scrap fabric for flap. You can make it the height you want, keeping the same width as everything else. So mine was 17" W x 7' H.
Two rectangles for lining:
One needs to be the same as the exterior, so 17" W x 12.5" H.
The other needs to be the same width, but you have to add the height of the flap and exterior piece together. So it will be 17" W x 19.5" H (12.5" + 7")
Four rectangles of batting that are the same as the exterior size = 17"W X12.5"H

You will have a total of 9 pieces of fabric/batting.

*It's better to have too much extra than not enough fabric!

Step 2: Overlap
Here you will pin the flap onto the WRONG side of your bigger lining piece. Make sure to line up the edge of flap to the edge of interior fabric. Hem all sides, then you will sew all sides. (See next step for alternative front flap hem) The lining that is still visible is the same size as the exterior pieces. So the back will be the exterior, then the flap will fold over to the front.

Step 3: Hem the Flap
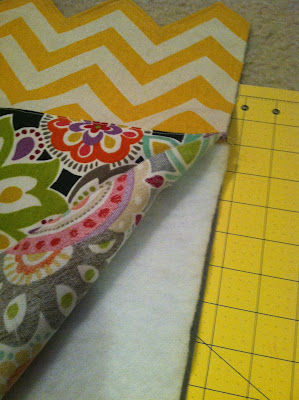
OPTIONAL: Here I decided to hem the edge in the pattern of the chevron instead of just straight across. To do this cut the chevron so there is one strip (off-white for this fabric) extra that you can hem. You will need to cut only the extra strip at each point up to the next strip (yellow). Then just fold it up so the strip you want to see is visible. Press then stitch. 
I did two lines just for fun :)

Step 4: 3 Pieces together
This step you will need to add one exterior piece to the piece with the flap. First, press the top edge (that will go long the flap). Then place the rectangle so the exterior and lining fabrics are wrong sides together, and sew only along the top edge where it barely overlaps the flap. 

Step 5: Batting
Lift the exterior fabric up and place two pieces of batting in between the exterior and lining. Make sure to place it all the way up so it is against the seam by the flap.

Step 6: Layer

Layer all of your pieces together! Here you will place your largest piece (with the flap) lining right side down, with the batting on top, then the exterior piece that is already sewn together. Then place the other exterior piece on top right side down, two pieces of batting, then interior piece wrong side down. It will look like this:


Step 7: Pin and sew!
You will need to pin all three outsides together. It is super thick so make sure you get all the pieces lined up and pinned well. Stick your laptop in to make sure it fits and to see how much you can take it in. I could take in just under an inch on each side since I used extra at the beginning.* Sew along the edge. Cut off the extra fabric from the seam. Mine ended up being super snug (which was just what I wanted). When you are done, turn it right side out.

*I had to sew this a couple times before I got every layer all the way around since it was so thick. I just scooted in a tad more each time to get everything. Make sure to check to see how your laptop fits before you make it too tight. 


Step 8: Button
Measure and mark where you want the button hole on the flap. My machine has a button hole foot so I just up it in the machine and it did it by itself (after I read all the instructions and did a test on a scrap of fabric). After that, place your laptop into the sleeve then fold over the flap. See where the button hole lines up and mark where the button will be. Sew on your button.

Now you have a super cute laptop sleeve! :)

Tuesday, January 15, 2013

Easy Smeazy


Here are two of my six projects I completed this week. They were super simple and fun!

Here is a "pencil pouch" that I will be using for my fabric scissors, measuring tape, and other small sewing gadgets. I found my fabric at JoAnn's. It was a fat-quarter for $1.99, inside is a piece of felt that was 34¢, and the zipper was $1.89. All totaling to $4.22. :) 

I found the tutorial here.

_________________________________________________________

My other project was a new make-up bag. Mine is too small and is getting a little dirty. So I decided to make a new one! I used the French Lavender Tweed for the outside and Babyville Boutique Waterproof PUL fabric in green for the inside (both found at JoAnn's). The PUL fabric is mostly used for reusable diapers (okkayy...I know, I know, weird) - but it was perfect for the inside of a make-up bag because it's waterproof and can be wiped down or washed!

It turned out to be my favorite! I found this tutorial here.

Saturday, January 12, 2013

"Sew" much fun

I finally have some time to sit down and do some sewing! YAY!

I went to Hobby Lobby and JoAnn's this week and found some great deals on fabric.

My Hobby Lobby deals:
1.25 yd Off-White Knit - $11.24  (Used the 40% off coupon) = $6.74
1 yd Burlap = $3.99
3/4 yd Brown Jersey Knit = $3.74
1/2 Lace Knit = $1.43 (Originally $4, found in the scrap bin because of small pink spots)
1/2 yd Yellow Chevron = $1.61 (Orinigally $4.50, found in the scrap bin that had "soiled" on the label because someone wrote on the top 2in x 2in corner)

The red chevron was purchased at Hobby Lobby last month. It's 3 yards and I used the 40% off coupon to get him for $18 instead of $29.97 :)

Total: $17.51 
Total Savings: $10.01


My JoAnn's findings:
Fiskers Fabric Cutting Set - $53.99 which was 40% off = $32.39
2.5 yds French Lavendar Tweed - one sale in the red tag bin for $10 that was then 50% off = $12.50
1.25 yd Aqua Herringbone Suiting - $16.24 (Used the 50% off coupon) = $8.12
1.25 yd Heather Blue Spandex Knit - $13.76 (Knits were 40% off) = $9.74
1 yd Suede - $12.99 (not on sale)
2 Fabric Quarters = $1.99 each 

Total: $79.72
Total Savings: $47.24 


Let the sewing begin!!

Sunday, January 6, 2013

Roasted Lemon Garlic Shrimp

My absolute favorite meal is roasted lemon garlic shrimp. It is ammaaazing!
Now, I'm not one for measuring, so when it comes to ingredients I just wing-it. 
It has worked well so far..

Prep Time: 15 minutes
Cook Time: 20 minutes
Total Time: 35 minutes

Ingredients:
About 1/3 cup olive oil
1 lemon, zested then cut into wedges
1 tbls lemon juice
Parsey Flakes, mostly for color
Salt and Peper
Fettuccine
1 1/2-2 tbls butter
Minced garlic, I use the kind in the jar
1 pound fresh shrimp, medium-sized, deveined with tails off  ($5 bag at Wal-Mart)
Instructions: 
          1. Preheat oven to 400 degrees F.  In an 8x8 glass baking pan combine olive oil, lemon zest, lemon juice and parsley leaves. Olive oil should literally cover the bottom of the pan, if it doesn't drizzle in a little more. Season with S and P. Bake in oven for about 10 minutes, checking every few minutes, if it looks like it is getting too brown remove and proceed to next step.  Meanwhile cook pasta, drain, and set aside.

          2. Remove pan from oven, add butter and move it around a little to melt, add shrimp, garlic of your preferred amount, and the lemons wedges, toss to coat with oil mixture. Bake for 8-10 more minutes or until shrimp start to curl and brown, check often.  If the shrimp is still pink, flip it to the boiler for a couple minutes. Serve over pasta, enjoy!
The left over butter /olive oil in the pan is perfect to roll corn on the cob in!
 
The original recipe was found here. I tweaked it a little more to my liking. :)


Glitter me - timber!

Another DIY that I did this weekend - a glitter mason jar with flowers. Cheap, easy, and pretty. It was super simple and took less than 5 minutes. All you do is coat the inside of the jar with mod podge, pour a fair amount of glitter in, put the lid on the jar and shake. After some good shakin', check inside to see if more glitter is needed and add accordingly. Let it dry for a couple of hours and use it as a vase, pencil cup, for make-up brushes, etc. It's not necessary but I used a top coat spray to help the glitter not get on everything I pull out of it.

I used Martha Stewart's Aquamarine glitter (found at Michael's)

To infinity, and beyond!

First of all, I love scarves, especially infinity scarves. I think they are a perfect accessory! I've always wanted to make one. So after many, many trips to Hobby Lobby and Joann's looking for the perfect knit fabric, I finally found the one. I found it at Hobby Lobby for $8.99/yd but use the 40% off coupon to get it for $4.50 (yay!). It's a beautiful combo of lace and turquoise and it was super easy to make. I found the tutorial here. Only difference was I used 1 yard of fabric rather than 2 and it still wrapped around twice. :)

I'm so glad I have my own sewing machine!
 Happy girl!

Saturday, January 5, 2013

Flannel

"Oh, Brother" - the words of my boyfriend when I told him I got a sewing machine for Christmas.

...Get it? (Brother is the brand) Haha. Anyway, I love my new machine! It's a simple one which is perfect for me. Since I was home on Christmas break, I thought I would make some pajama pants (with the help of my mom of course). I got to use her nice sewing room and all her goods. :) We started with a pattern that was only 2 parts - each leg was one piece of fabric that you sew together at the crotch. But, me being me, I wanted pockets! So my mom really helped me on that part. We ended up taking the pocket pattern from a pair of scrubs and cutting our original pattern in half (so there were 2 pieces of fabric per leg = 4 total) . 


After some math, pinning, sewing, ironing, more pinning and sewing, and elastic I was done.


And I decided to make a matching pair (pockets and all) for my oh-so-loving boyfriend. :)