Showing posts with label Chevron. Show all posts

Sunday, October 27, 2013

Tablet Tripod

Sometimes I just want to sit my iPad up, but the fold-up-rubbery cover just doesn't want to hold it! So this little pillow is now one of my favorite items and I use it all the time! I use it when I need to read recipes, plan lessons, post grades, Skype, scroll Chive, and whenever my arm gets tired while I lay on my side - I know I'm not the only one who does this (ha).

I kept forgetting to take pictures along the way (I was too excited to get it done) so I'll do my best on this tutorial!

Time: 45 minutes


Materials Needed:
Scrap of fabric
Needle
Thread
Disappearing ink pen
Fiberfill
Batting
Scissors
Sewing Machine
Box of rice
Funnel  

*I made mine to fit my iPad mini. If you have a 
different tablet you can make it bigger or smaller.

Directions:
Step 1: Cut a piece of fabric that is 14in x 9in

Step 2: Fold right sides together hamburger style. 
Sew along two sides - one long edge and one short edge.

Step 3: Turn right side out and pull on sewn corner to lay over the flat 
piece so that where you see the seam is a square. Then pull the top corner 
up so there is a flat bottom (how it looks in the picture), and pin up the 
bottom corner. Use a needle and thread to hand stitch it to seam like shown above.


Step 4: Draw a line where you are happy with the pod height using 
a disappearing ink pen. I left about 4 inches to work with for the iPad to rest. 
Leave about an inch open on the seam so you can fill it with rice. 

Step 5: (Sorry for the sideways pictures) Take your funnel and place 
it into the hole you left open. I used a piece of paper because I couldn't 
find my funnel - so use whatever you can. Take your box of rice 
and get to pourin'! You could use fiberfill here, but it won't be as 
sturdy and it will be hard to keep the shape that you want. Rice is cheap and 
definitely does the job. I filled mine to where there was an inch empty at the top.

Step 6: After the rice, finish sewing the line so that you have about 4 inches 
open to work with. It's tricky to finish the line, so to do so tip your pod
 upside down so all of the rice goes to the top, take you fingers and pinch 
near the hole so the rice doesn't come back through, place under your needle
 (while still pinching) and finish your seam.

Step 7: Place a piece of batting between the two layers and sew two 
quilted lines using your previous seem as a guide. 

Step 8: Sew the final seam with the edges either folded under or
 into the middle. Fill the small pouch with fiberfill and close up!


Wishing you good luck!


Sunday, February 10, 2013

Be Mine

Burlap and Chevron Heart

 
Materials:
1/3 yd Burlap
Scrap of Chevron or other fabric
Wal-mart bags or fiberfill
Black thread
 Wire hanger

Directions:
Fold scrap of fabric in half and cut out a heart (half since it is folded). Place it on top of a larger square piece of burlap. Stitch around the edge of the heart leaving a 3-4 inch hole, so it is now one piece with the burlap. Fill the chevron with fiberfill or Wal-Mart bags (I used about 8-9 bags) using a butter knife to stuff them up in the top. Sew the hole shut once you're happy with the fluffiness. Next take another square piece of burlap and place underneath. Stitch around the heart about an inch away for a border. Cut the burlap in the shape of the heart and fray the edges with your fingers. Take your wire hanger and bend or cut so the hook is gone. Poke each end through your burlap at the top and bend to each other. Bend or cut access off. Tie a ribbon and hang over a door using a command hook on the back!

Inspired by a friend on FB I decided to make my own! It's a little bigger than a boys' basketball.

Wednesday, January 23, 2013

DIY Laptop Sleeve: Tutorial


Here is a laptop sleeve tutorial. It's simple and can be done in about an hour!


Materials:
1/2 yard exterior fabric (flower fabric from Hobby Lobby)
1/2 yard for lining (I used faux gray suede - super soft)
Scrap of fabric for flap
Batting
1 Button
Sewing Machine
Needle and thread (for button)

First, measure your laptop. 
Mine is a 15" Macbook Pro so it ended up being 14.5" W x 10" H x 1" D
You will need to allow for seam allowance. I added 2.5 inches extra because I used double batting. Total equals = 17" W x 12.5" H

Step 1: Cut

Two rectangles of exterior fabric measuring 17" W x 12.5" H (or insert your numbers here)
One rectangle of scrap fabric for flap. You can make it the height you want, keeping the same width as everything else. So mine was 17" W x 7' H.
Two rectangles for lining:
One needs to be the same as the exterior, so 17" W x 12.5" H.
The other needs to be the same width, but you have to add the height of the flap and exterior piece together. So it will be 17" W x 19.5" H (12.5" + 7")
Four rectangles of batting that are the same as the exterior size = 17"W X12.5"H

You will have a total of 9 pieces of fabric/batting.

*It's better to have too much extra than not enough fabric!

Step 2: Overlap
Here you will pin the flap onto the WRONG side of your bigger lining piece. Make sure to line up the edge of flap to the edge of interior fabric. Hem all sides, then you will sew all sides. (See next step for alternative front flap hem) The lining that is still visible is the same size as the exterior pieces. So the back will be the exterior, then the flap will fold over to the front.

Step 3: Hem the Flap
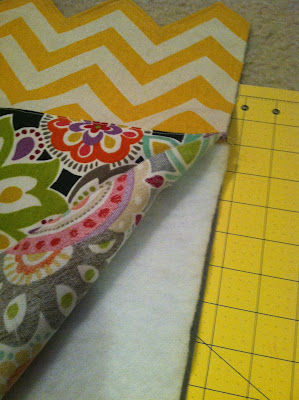
OPTIONAL: Here I decided to hem the edge in the pattern of the chevron instead of just straight across. To do this cut the chevron so there is one strip (off-white for this fabric) extra that you can hem. You will need to cut only the extra strip at each point up to the next strip (yellow). Then just fold it up so the strip you want to see is visible. Press then stitch. 
I did two lines just for fun :)

Step 4: 3 Pieces together
This step you will need to add one exterior piece to the piece with the flap. First, press the top edge (that will go long the flap). Then place the rectangle so the exterior and lining fabrics are wrong sides together, and sew only along the top edge where it barely overlaps the flap. 

Step 5: Batting
Lift the exterior fabric up and place two pieces of batting in between the exterior and lining. Make sure to place it all the way up so it is against the seam by the flap.

Step 6: Layer

Layer all of your pieces together! Here you will place your largest piece (with the flap) lining right side down, with the batting on top, then the exterior piece that is already sewn together. Then place the other exterior piece on top right side down, two pieces of batting, then interior piece wrong side down. It will look like this:


Step 7: Pin and sew!
You will need to pin all three outsides together. It is super thick so make sure you get all the pieces lined up and pinned well. Stick your laptop in to make sure it fits and to see how much you can take it in. I could take in just under an inch on each side since I used extra at the beginning.* Sew along the edge. Cut off the extra fabric from the seam. Mine ended up being super snug (which was just what I wanted). When you are done, turn it right side out.

*I had to sew this a couple times before I got every layer all the way around since it was so thick. I just scooted in a tad more each time to get everything. Make sure to check to see how your laptop fits before you make it too tight. 


Step 8: Button
Measure and mark where you want the button hole on the flap. My machine has a button hole foot so I just up it in the machine and it did it by itself (after I read all the instructions and did a test on a scrap of fabric). After that, place your laptop into the sleeve then fold over the flap. See where the button hole lines up and mark where the button will be. Sew on your button.

Now you have a super cute laptop sleeve! :)

Wednesday, December 12, 2012

Patterns

This past weekend was wonderful. My mom came in to spend some time with me and do a little Christmas shopping. We spent the most time in Hobby Lobby (of course) wandering around getting idea after idea. I get my creativity from her. Although she loves fabric and sewing and I love paper and painting, we meet in the somewhere in the middle. Together we will think of some spiffy stuff.  :)

Anyway, I got to work on a project I have been putting off. I had bought some cardboard letters that spell "HOGS" a while back at HobLob but I never did anything to them. They were meant for a wreath, but they were too heavy to glue to decomesh. So they sat in my Papasun chair for a while. I finally thought of another idea and finally found the time to work on it.

First, I painted the letters white. Then I picked a print for each one. The H is chevron, O is houndstooth, G is argyle-ish, and the S is just vertical stripes. As I do on canvases, I drew everything out with a pencil. Once I stenciled every pattern on I went to town with a thin black paint pen. Now, the patterns were super easy - except for houndstooth. I looked up the pattern online, and imagined the process in my head. I'm not going to lie, it took me about 3 hours and a lot of double-checking. But once I figured it out and got the hang of it it was pretty easy. I will put a tutorial up later. After the patterns, I colored the sides of the letters black. Once they were done, I painted my canvas in a Razorback red and painted the edges black as well. Then I stuck the letters to the canvas!

This one was super fun to make!

Saturday, August 11, 2012

So. Much. Tape.

Today was a craft day. I've had two canvases for a couple months because I couldn't decide (I'm a horrible decision maker) what to do with them. But I finally decided and went with it. I love the chevron print, so that was my first one.